How it's made April 17 2017, 1 Comment
Several people have been asking me about the process behind my handcrafted jewelry pieces. Is it really all handmade from scratch? Is that why the price is typically higher than comparable machine-made items?
Well, I documented the creation of one of my last orders so you could see for yourself!
Here's how this beautiful pair of sterling silver geometric earrings came to life. In about 15 easy-ish steps... Enjoy!

I started with silver wire in two different gauges (thicker for rectangles and thinner for small rings).

Then I measured and cut all the pieces I would need to craft the earrings (and shaped the jump rings).

After that I shaped the rectangles, making sure the ends had near perfect contact (so they could be soldered).

I then soldered the rectangles shut using a small butane torch.

After the soldering, I filed the joints to make them smooth and even with the rest of the wire.

After the soldering, I re-worked the shape of the rectangles to make them as "rectangle" as possible and also to make sure they were all about the same length & width (otherwise, one earring could end up significantly longer than the other. Not quite as easy as it sounds, and sometimes takes quite a while.

Then came the hammering. One hammer to flatten the shapes and another to give then the "hammered" texture.


The next step was to solder the jump rings shut and to the rectangles (being careful to find the center).

More soldering after this step: joining the rectangles with another ring and soldering it shut. This part is tricky. You need to use a solder that flows (melts) at a lower temperature and remove the heat as soon as it does to keep the previously soldered rings from getting "unsoldered".

I then bathed my freshly soldered pieces in the "pickle" solution to clean the metal and remove the fire stains ("pickles" are a mixture of an acid or an acid salt and water).

Then I put my clean pieces in the tumbler over night to polish them (with stainless steel shot, water and a bit of dish soap).


I took them out the next morning and patted them dry. They are now nice & shiny!

Last step was to attach the ear wires (the one thing I often don't make from scratch as it is more time & cost effective to buy them already made).
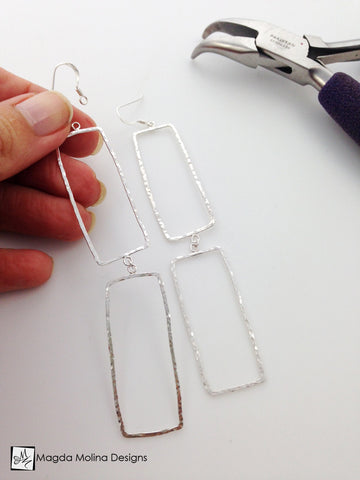
They were then ready to wear!

Hope you enjoyed this process! Feel free to leave comments if you have any questions.
These earrings can be found/purchased HERE.
Comments
Dinah M on July 14 2017 at 03:57PM
Beautiful! Love the process. I’m a little nervous when I solder.
Thank you!